Here you will find help, tips and information for the use of our Nastran 3D Viewer. If you have any question do not hesitate to contact us!
Content
- Shortucts
- Animation
- VDI and remote desktop
- Scripting
- Stress results
Shortucts
Rotate view : left clic and hold
Center view and move center of rotation : right clic on a node
Move view : right clic and hold
Zoom : scrollwheel or middle button and hold
Z rotate : ctrl + left clic and hold
Bouding box selection : shift + left clic and hold
‘R’ : activate/desactivate the selection by bounding box (press once to activate, once more to desactivate, do not stay pressed)
Hide a property or include : middle clic (or Alt+left clic) on an element
ctrl: Invert selections
F1: Toggle Property ID / Include / Material ID display
F2: Toggle display type (shaded, wireframe, …)
F3: Center view
F4: Screenshot
F5: Align view
F6: Change selection color
F7: Display/hide local coord systems
F8: Invert displayed/hidden elements
F9: Change PID or Include color of selected elements
F10: Display element thickness by 3D elements
F11: Randomise colors
Deformation animation
There are two kinds of animation available in Nastran 3D Viewer : linear and transient.

Note: only node displacements are taken into account in the software, node rotations are not used. You should consider this if node rotations prevail in your load case results.
Linear animation
Linear animation is available as soon as deformation results have been loaded. It allows to animate harmonic responses by a variation of the phase over 360° and to animate static responses by a linear ratio between 0 and 1. It also allows to animate one particular step of a transient response as if it was a static case.
The scale ratio is automatically computed in order to have a maximum deformation of around 10% of the model size.
Once a load case is displayed, the time taken to load and display this case is measured. Then the number of animation step is computed as follow :
- Objective of a 3 seconds animation at a frame rate of approx. 27 fps.
- If the loading time is fast, the maximum number of frame will be 80 (80/3~=27).
- The number of frame will decrease as the loading time increase.
- If the loading time is very slow the minimum number of frame will be 20.
Transient animation
The transient animation button appears as soon as transient results are loaded. This button display a transient animation dialog wich alows to select different parameters.
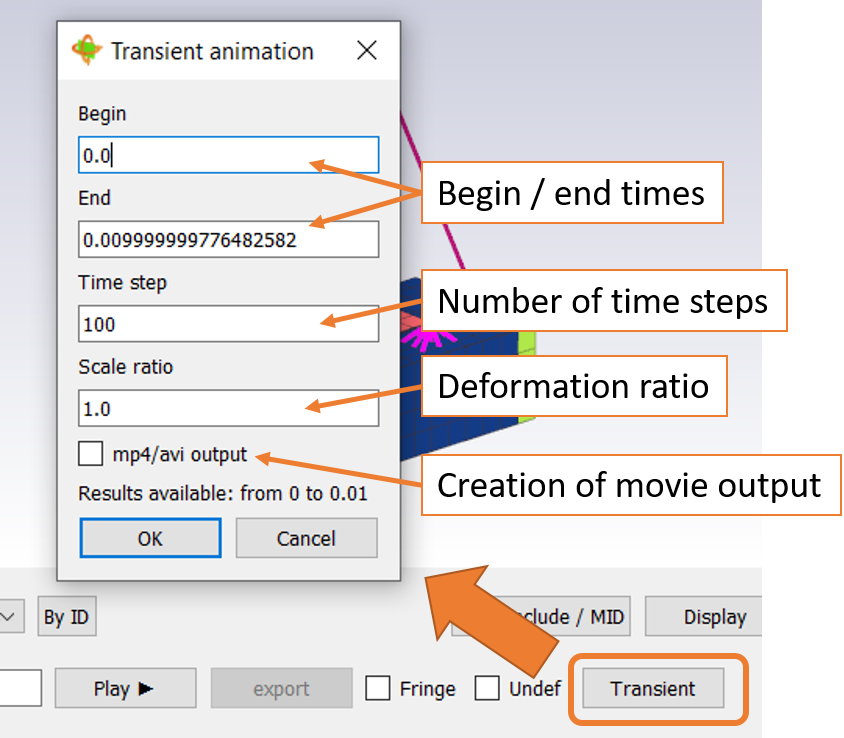
- Begin and end time for the simulation (if a time is set out of the available range then the first available time will be used).
- Number of steps : this will determine how many time steps will be displayed. Once calculated the animation will be displayed with an objective frame rate of 20 fps (this means that a 100 frames animation will be played during 5s).
- Deformation scale.
- Check box to enable the movie output.
Interpolation
In order to have an animation linear along time, deformations will be interpolated if the required time is not near an already calculated time (condition is a time distance of less than 1% of the time step).
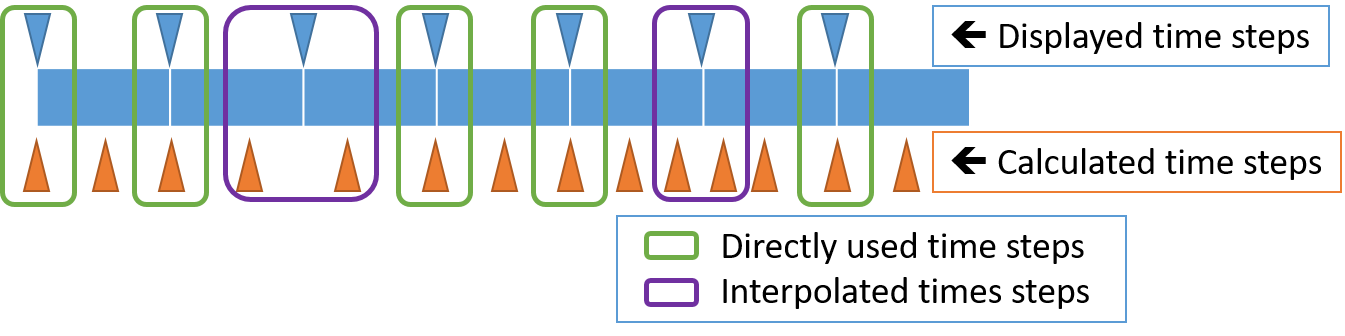
Example : we want 100 steps between 0s and 1s (time step of 0.01s, 1% of this is 0.0001s). In Nastran the transient time steps are often variable, for the 20th step (theorically 0.20s) if there is a calculated step at 0.20008s then we display directly this step, but if there is a calculated step at 0.198s and another at 0.205s we will calculate an interpolation between those two steps (interpolation linear).
VDI and remote desktop
If you encounter problem while running Nastran 3D Viewer from a VDI or remote desktop (the window open and close rapidly), the problem is often due to an hardware opengl compatilibity issue.
One solution is to use the the Mesa 3D Graphics Library it exists some versions already compiled for windows like here. You only have to copy the opengl32.dll file into the software folder to activate software rendering at startup.
Scripting
Since v1.44 it is possible to use scripts to automaticaly load model, orient view, take screenshots, export deformation pictures, etc…
Here is the description of functions available for scripting. More fonctions will come, do not hesitate to contact us if you have specific needs.
LOADMODEL | path <str> | append model <True/False> | load results <True/False>
  Load the model path (bdf, op2, h5)
  If append = False already loaded models are cleared before import
  Result loading possible for op2 and h5 files
  Note : this function changes the active directory
LOADRESULT | path <str>
  Load result from op2, h5 or pch file
WINDOW | Maximized or Normal <str>
  Resize window in fullscreen or normal mode
WINDOW | W <int> | H <int>
  Resize window in W x H pixel
DRAWSIZE | W <int> | H <int>
  Resize the window in order to have a viewer area of W x H pixel
LATERALBAR | Show or Hide <str> | N <int>
  Show/Hide lateral bar and select the Nth category
     1=Include
     2=PID
     3=MID
     4=Elm Type
     5=Boundary Conditions
REMOVE_UNUSED_NODES
  Remove unused nodes display
DISPLAY | PID, INCLUDE, MID, FLAT, SHADED, HIDDEN, WIREFRAME
  Change display mode
ORIENTVIEW | x1 | y1 | z1 | x2 | y2 | z2 <float>
  View orientation
  x1, y1, z1 = position of viewer relative to focused point
  x2, y2, z2 = orientation of vertical
  Samples :
    - Iso view: ORIENTVIEW | -0.5 | 0.3 | 0.5 | 0. | 1. | 0.
    - xy view : ORIENTVIEW | 0. | 0. | 1. | 0. | 1. | 0.
FRINGE | <True/False> or "Deformation magnitude"|"ESE %"|"Von Mises Stress"|"Max Principal Stress"|"Min Principal Stress"
UNDEF| <True/False>
LOADDEF | <int>
  Load deformation case
PNGOUTPUT|path_to_.png or clipboard <str>
  Write image to file or clpiboard
EXPORTDEF|path <str>|name-%.3d.png <str>|start <int>|end <int>
  Export multiple displacements to image
  Images are exported to path
  Images are named with %d as case number
  From start to end (to export all disp: specify a large end number)
SAVELOG | path <str>
  Save content of information box in txt file
SHOWDETAIL | Type (GRID,ELM,CORD) <str> | IDs <int> or <str>
  Show detail or select multiple
  Note: keep in mind that selecting a unique node will center the view on this node. Redo an ORIENTVIEW to reset view.
MPCCREATE | IDs <int> or <str> | Type (RBE2, RBE3) | PosX (float or auto) | PosY (float or auto) | PosZ (float or auto) | CP <int> | CD <int> | GID <int> | output path <str>
  Automatic creation of MPC
BCSHOW | BC_NAME or CLEAR <str>
  Display boundary condition corresponding to BC_NAME or deselect all
THICKNESS | FRINGE or 3D or CBEAM
  Display element thickness / section of CBEAM
PAUSE | s <float>
  Pause script execution for s seconds
PRINT | m <str>
  Display message in information box
CLOSE
  Quit viewer
Stress result display
Since v1.50 it is possible to display element stress fringe.
Notes:
- Stress must be output in op2 file (PARAM,POST,-1) with a command STRESS(PLOT)=…
- Only static and transient results are taken into account.
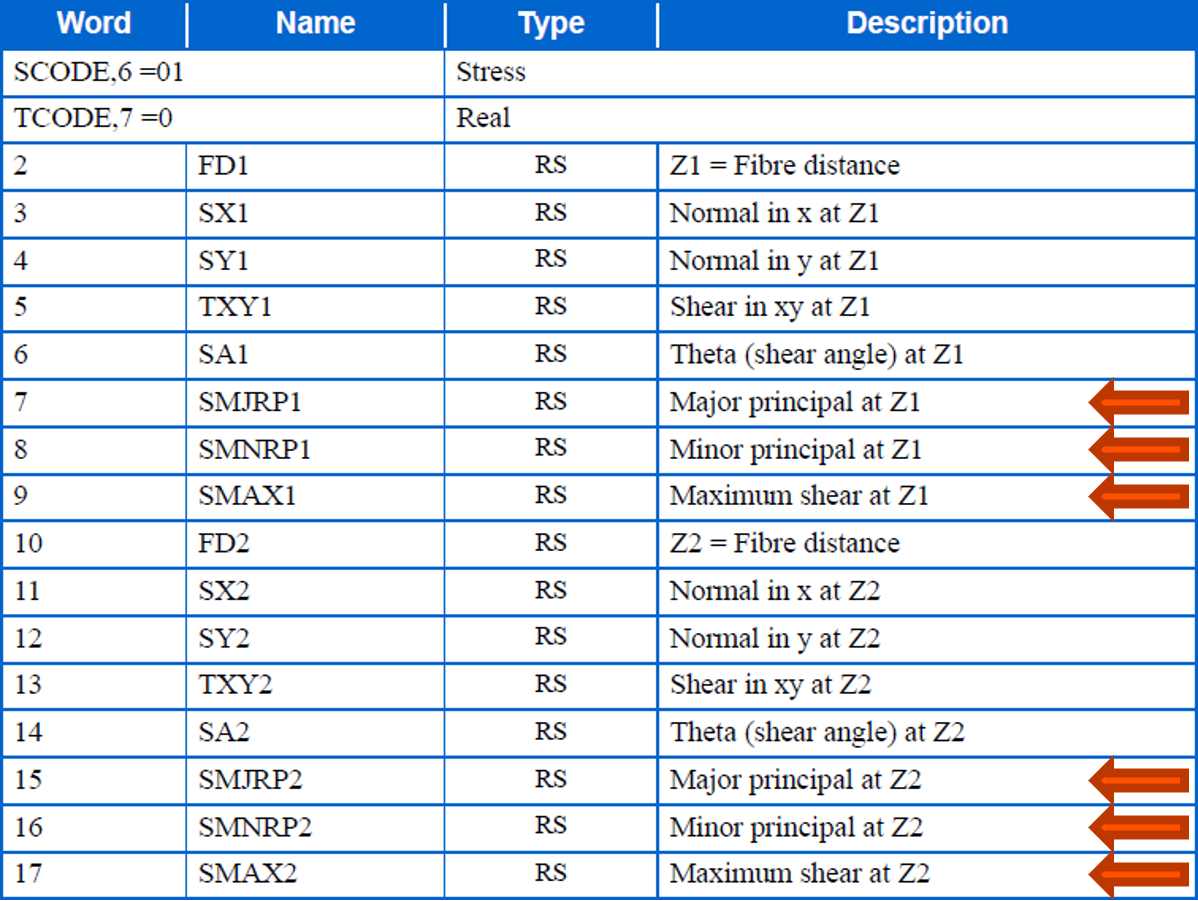
For QUAD / TRIA the following results are displayed :
- Von Mises = max(SMAX1 ; SMAX2)
- Max Principal = max(SMJRP1;SMNRP1; SMJRP2;SMNRP2)
- Min Principal = min(SMJRP1;SMNRP1; SMJRP2;SMNRP2)
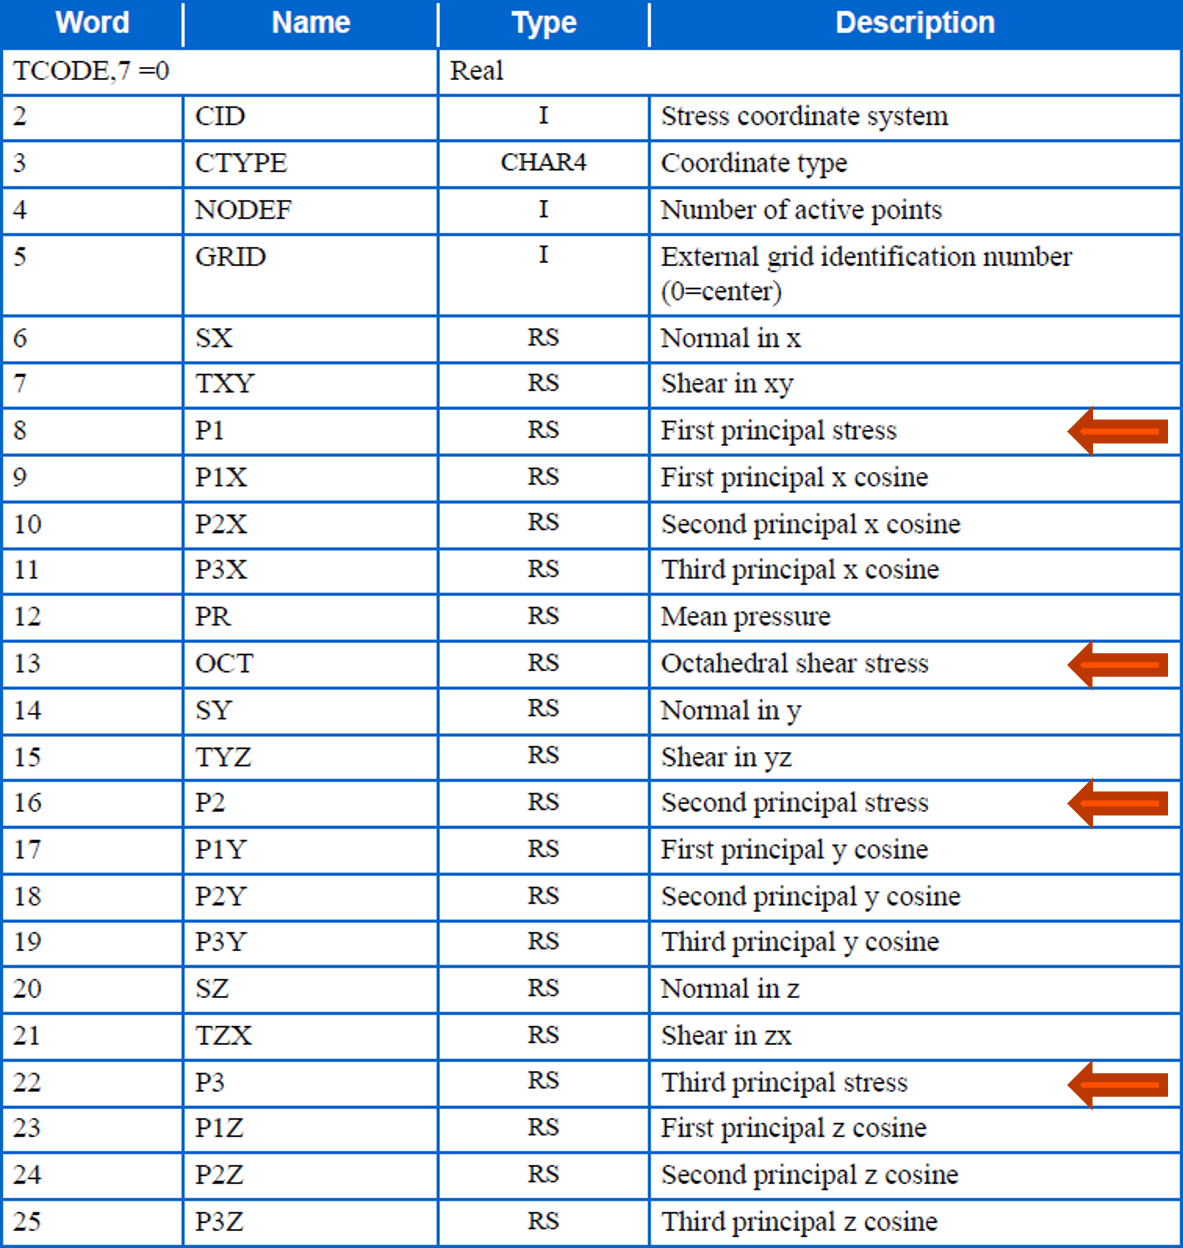
For HEXA / PENTA / TETRA the following results are displayed :
- Von Mises = OCT
- Max Principal = max(P1;P2;P3)
- Min Principal = min(P1;P2;P3)